Tuesday, September 1, 2009
Wednesday, July 23, 2008
Multi Colored Hand Rolled Candles
 8
8
 7
7


Cover your work surface with newspaper and two plates with wax paper. After you have melted the waxes with the two colors of dye, use a measuring cup to scoop up some of one of the colors of melted wax. Slowly pour it in the center of the plate covered with wax paper. Continue to add wax until the plate is almost full, leaving about 2 inches in from the edge free of wax. You may find that the wax paper buckles a bit so push the buckled areas down gently with a Popsicle stick. Repeat for the other color of wax.
Allow your wax to cool slightly so it is warm but not too hot to touch. It needs to be pliable to be able to work with it. Pull the wax paper with the partially hardened wax on it off the plates onto your work surface. Separate the wax from the wax paper and lay it back down on the wax paper. Do not lay the wax on the newspaper because you will most likely get newpaper print on it and it may stick to the newspaper.
Next, cut out a square area with a knife. Pull away the remnants from outside of the square. Put the remnants aside so you can use them later. Cut the large square of wax into a few more squares of various sizes. Repeat for the other color.
Stack the squares on top of each other in an uneven pile.
Tear off a second piece of wax paper and lay it on top of the squares of wax. Roll out the wax with a rolling pin until it is approximately 1/4" thick , exerting light to medium pressure on the wax.
This is what the wax will look like after you have rolled it out with the rolling pin. Before you are able to roll it up into a candle you need to trim it to slightly even out the edges (see the next photo).
Lay a piece of wick across the bottom of the square of wax leaving one end of the piece of wick extending past one end of the candle. (You can leave a bit of wick sticking out the other end as well, just remember to trim it off during the last step). Next, use your fingers to roll the wax up tightly around the wick. Once the wax is wrapped tightly around the wick, continue to roll the wax up until the candle is complete.
Trim the wick to 1/4" from the top, and if you have a bit sticking out of the bottom (as seen in the picture above), make sure to trim it so it's even with the base of the candle. If the base of your candle isn't quite even, you can lightly press down on it to make it flat since the wax will still be soft. Allow the candle to cool and harden completely before lighting.
Tuesday, December 11, 2007
Christmas Time!!

Hey people....
Its Christmas time & here I am to give you some tips on how to make some homemade gifts :)
Candles are beautiful & can be used for every occasion possible.
Let me teach you how to make 'Ice Candles'
Things needed:
~Wax tablets
~Crayons(color of your choice)
~Ice cubes
~Empty Tetra pack
~Vessel to melt wax
~Thread(for the wick)
Method:
-Melt the wax with the crayons.
-Cut open the top portion of the tetra pack
-Secure the wick to the base of the pack
-Pour the melted wax to make a base for the candle.
-Drop some ice cubes inside
-Pour some more melted wax
When the wax solidifies, cut open the packet. The ice cubes inside would have melted in the heat & there would be open hole in the place of the ice cubes.
Thursday, December 6, 2007
Leaf Painting

Materials
- Fabric Paint - different colours
- Brush
- Palette
- Leaves -any thick veined leaf different shapes and sizes
- Cloth
A very easy method that anyone can try out, to make beautiful designs on your Saree, shawl or table cloth etc. The perfection and beauty of the print depends on the colour combinations you choose. If the fabric is dark then light colour paints will look better and vice versa. It can be done even on expensive silk fabrics.
Procedure
 Take leaves of different shapes, especially thick veined leaves with curved edges will look nice.
 - Iron the cloth in order to make it wrinkle free.
- Decide on the design and paints.
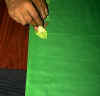
- Paint the back or wrong side of the leaf completely with the chosen colour.
- Stick the leaf on the cloth and press well.
-
 Before making the print on the good material it is better have a trial on the rough cloth.
 - Leaves can be stuck in a straight line or randomly according to your aesthetic taste.
- Let it dry for 24 hrs or dry it in the sun for an hour.
- For the painting to last longer, iron the back side of the design. Ironing should be done only after drying.
Tuesday, November 27, 2007

Tanjore Painting or Tanjavur Painting is a form of art developed in the Southern part of India in a place called Tanjore or Tanjavur.
About 350 Km south of Chennai in Tamil Nadu, Tanjore, once capital of the Chola Empire, was ruled by the Marathas in the 17th century. The Maratha rulers encouraged this art in Tanjore. In Mysore the art was patronized by Maharaja Mummadi Krishnarajendra Wodeyar
This form of art is unique. It uses a lot of precious stones and pure gold foils to fill in as ornaments and clothing of the figurines, mostly depicting Hindu Mythology Gods like Shiva, Vishnu, Lakshmi, Parvathi, Krishna, Ganesh and others. These paintings are in great demand for decorating the living room and puja or prayer room of many.
The art has undergone quite a bit of change, not in the style of the painting, but in the use of raw material for preparing the board and the use of painting material as well as the use of synthetic material in place of precious stones.
The use of pure gold foil of 22/ 24 carat continues and the life of such paintings is long if done and preserved in a correct manner.
There are SEVEN STEPS to making a Tanjore painting:
STEP 1. Prepare the board to make the painting.
STEP 2 Sketch the figure and fix the stones.
STEP 3 Fill around the stone work with a thin mix of gum and chalk powder.
Inlay and relief work around the stone setting with a thicker mix.
STEP 4 Clean the work and fix the gold foil over the stones and relief work.
STEP 5 Cut the gold foil to expose the stone work.
STEP 6 Paint the figures and the background
STEP 7 Check for flaws, correct and fix the glass and frame.
Wednesday, October 17, 2007
Madhubani Painting

Madhubani painting has been done traditionally by the women of villages around the present town of Madhubani (the literal meaning of which is forests of honey) and other areas of Mithila. The painting was traditionally done on freshly plastered mud wall of huts, but now it is also done on cloth, hand-made paper and canvas.
Madhubani paintings mostly depict nature and Hindu devotional events, and the themes generally revolve around Hindu deities like Krishna, Ram, Shiva, Durga, Lakshmi, and Saraswati. Natural objects like the sun, the moon, and the religious plants like tulsi are also widely painted, along side scenes from the royal courts and social events like weddings.